Unity
Integrate Noctua Account
The Noctua SDK provides a simple yet powerful authentication system.
We provide a complete solution for authentication, including integration with social login providers such as Google, Facebook, and more. You can use this feature to allow players to sign in with their existing accounts without the need to implement the login flow yourself.
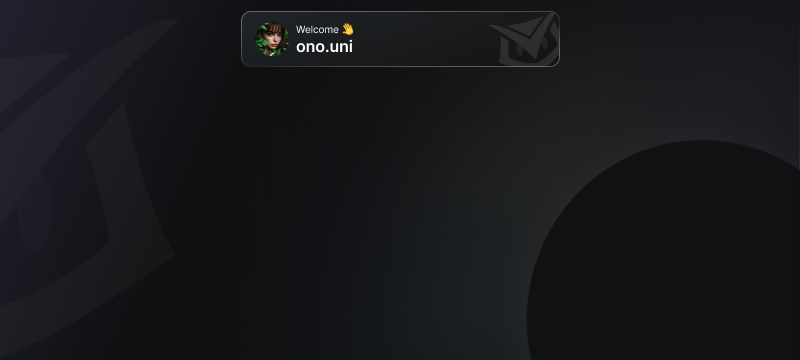
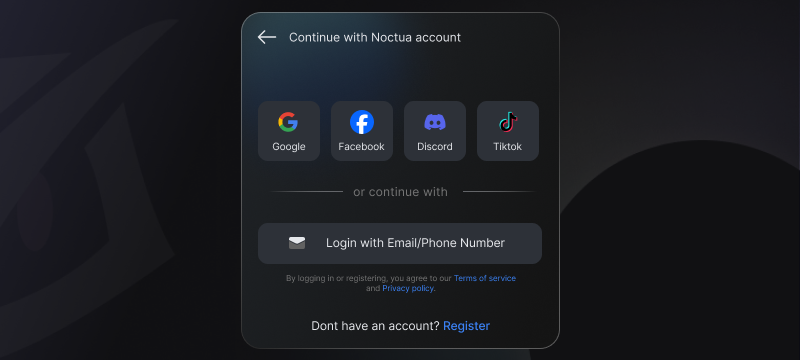
A welcome toast will be shown when the player is authenticated. Guest account will be created automatically if no account is found. You can integrate Switch Account button for players to switch account and authenticate with different accounts including social login providers. See Switch Account for more information.
How It Works
The main function you'll use is Noctua.Auth.AuthenticateAsync(). This function handles both guest and Noctua account logins automatically. When you call this function, the following process occurs:
- Your game calls
Noctua.Auth.AuthenticateAsync(). - The SDK checks for existing account information and attempts an automatic login.
- Depending on the account status, one of two things happens:
- For new users or those without a Noctua account, a guest login is performed.
- For returning users with a Noctua account, the login is updated.
- The Auth Server returns a UserBundle object.
- The SDK returns a UserBundle object to your game, containing the user's information.
- Your game calls
Noctua.Auth.UpdateUserAsync()to update the user's role ID and server ID.
- If there is an exception
Implementation
Here's how to implement authentication in your game:
using com.noctuagames.sdk;
using Cysharp.Threading.Tasks;
using UnityEngine;

public class AuthenticationManager : MonoBehaviour
{
    private void Awake()
    {
        StartCoroutine(Authenticate().ToCoroutine());
    }

    private async UniTask Authenticate()
    {
        // Authenticate
        try {
            var user = await Noctua.Auth.AuthenticateAsync();
            // Handle the user information
            // Use the Player.Id to identify the user
            var playerId = user.Player.Id;
            Debug.Log("PlayerId: " + playerId);
        } catch (Exception e) {
            if (e is NoctuaException noctuaEx)
            {
                Debug.Log("NoctuaException: " + noctuaEx.ErrorCode + " : " + noctuaEx.Message);
            } else {
                Debug.Log("Exception: " + e);
            }
        }

        // Update role ID and server ID
        var playerData = new PlayerAccountData
        {
            IngameUsername = "CoolGamer123",
            IngameServerId = "Server001",
            IngameRoleId = "Role789",
            Extra = new Dictionary<string, string>
            {
                { "level", "42" },
                { "xp", "9876" }
            }
        };

        try {
            await Noctua.Auth.UpdatePlayerAccountAsync(playerData);

        } catch (Exception e) {

            // Handle Authentication Failures

            if (e is NoctuaException noctuaEx)
            {
                Debug.Log("NoctuaException: " + noctuaEx.ErrorCode + " : " + noctuaEx.Message);
            } else {
                Debug.Log("Exception: " + e);
            }
        }
    }
}
Call the Noctua.Auth.AuthenticateAsync() method when you want to authenticate the user, typically at the start of your game or when entering a launcher screen.
Authentication failures
When implementing authentication, it's crucial to handle error cases properly, especially when dealing with banned users. The SDK is already implement proper error messaging to inform users about the reason for authentication failure. Your responsibility is to prevent the user from proceeding to the game to ensure that unauthorized users cannot access your game content and maintains the integrity of your player ecosystem.
In the case of banned user, a dialog will appear to notify user about their account status and the exception will be fired once the user clicked "OK" button of the banned dialog.
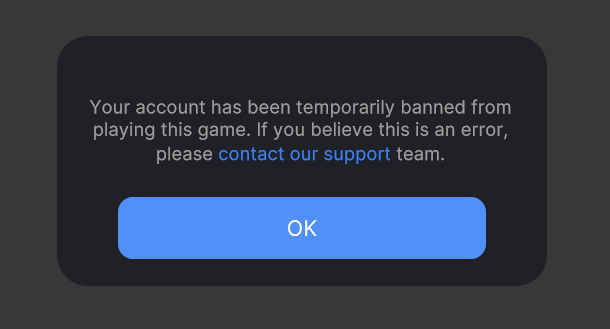
Banned user has specific error code: 2202. The following is an example of how to handle banned user.
            try
            {
                await Noctua.InitAsync();

                await Noctua.Auth.AuthenticateAsync();
            }
            catch (Exception e)
            {
                NoctuaException noctuaEx = e as NoctuaException;
                Debug.Log("SplashScript AuthenticateAsync " + noctuaEx.ErrorCode + " : " + noctuaEx.Message);

                if (noctuaEx != null && noctuaEx.ErrorCode == 2202)
                {
                    // Prevent user from entering the gameplay.
                }
                else
                {
                    // Handle other errors following your use cases.
                }
            }
Best Practices
- Error Handling: Always check for errors in the callback and handle them appropriately.
- Persistence: The SDK handles token storage automatically, so you don't need to manage this yourself.
- Unique User Identification: Always use the
UserBundle.Player.Idto identify users. This value is guaranteed to be unique for each user.
Note
The Noctua.Auth.AuthenticateAsync() function is designed to work seamlessly for both new and returning users. You don't need to differentiate between guest and Noctua account logins in your initial authentication call.
UserBundle object
The UserBundle object contains the user's information. It is returned by the Noctua.Auth.AuthenticateAsync() function.
Note
You don't need to manage the UserBundle object yourself. It is automatically handled by the SDK. We display it here for your reference. You might only need to use the Player object.
| Property | Type | Description |
|---|---|---|
| User | User | The user associated with this bundle. |
| Credential | Credential | The credential associated with this bundle. |
| Player | Player | The player associated with this bundle. |
| LastUsed | DateTime | The date and time when this bundle was last used. |
| IsGuest | bool | Indicates whether this is a guest user. |
| IsRecent | bool | Indicates whether this bundle was recently used. |
| PlayerAccounts | List<Player> | A list of player accounts associated with this user. |
Player
The Player class represents a player in the game system.
| Property | Type | Description |
|---|---|---|
| AccessToken | string | The access token for the player. |
| Id | int | The unique identifier for the player. |
| RoleId | string | The role identifier for the player. |
| ServerId | string | The server identifier the player is associated with. |
| Username | string | The in-game username of the player. |
| GameId | int | The identifier of the game the player is associated with. |
| GameName | string | The name of the game the player is associated with. |
| GamePlatformId | int | The identifier of the game platform. |
| GamePlatform | string | The name of the game platform. |
| GameOS | string | The operating system of the game. |
| BundleId | string | The bundle identifier associated with the player. |
| User | User | The user associated with this player. |
| UserId | int | The identifier of the user associated with this player. |
Unique User Identifier
The Player.Id is the most important property to use for identifying users. It is guaranteed to be unique for each user.
User
The User class represents a user in the system.
| Property | Type | Description |
|---|---|---|
| Id | int | The unique identifier for the user. |
| Nickname | string | The user's nickname or display name. |
| EmailAddress | string | The user's email address. |
| PhoneNumbers | string | The user's phone number(s). |
User.Id
Don't use User.Id to identify users. Use Player.Id instead.
JsonProperty
All classes use the JsonProperty attribute to specify the JSON property names for serialization and deserialization.
Server-Side Validation
To ensure secure access to your game, the Noctua SDK offers a robust server-side validation mechanism for user credentials. This process uses JSON Web Key Sets (JWKS) for token validation.
JWKS Overview
JWKS (JSON Web Key Set) is a standard for securely transmitting cryptographic keys. You can learn more about JWKS in the RFC 7517 specification.
Validation Process
To implement server-side validation:
- Retrieve the
Player.AccessTokenfrom the client-side. - Send this token to your backend server.
- On your server, fetch the JWKS from our endpoint:
https://sdk-api-v2.noctuaprojects.com/api/v1/auth/jwks - Use the JWKS to validate the token.
Here's a simple example of how to validate the token.
<?php

use Jose\Component\Core\JWK;
use Jose\Component\Core\JWKSet;
use Jose\Component\Signature\JWSVerifier;
use Jose\Component\Signature\Algorithm\ES256;
use Jose\Component\Signature\Serializer\CompactSerializer;

// Fetch JWKS from the server
$jwksJson = file_get_contents('https://sdk-api-v2.noctuaprojects.com/api/v1/auth/jwks');
$jwks = JWKSet::createFromJson($jwksJson);

$access_token = 'DUMMY_ACCESS_TOKEN';

// Parse the token
$serializer = new CompactSerializer();
$jws = $serializer->unserialize($access_token);

// Get the key ID from the token header
$headers = $jws->getSignature(0)->getProtectedHeader();
$kid = $headers['kid'] ?? null;

if ($kid === null) {
    throw new Exception('No "kid" found in token header');
}

// Find the corresponding key in the JWKS
$jwk = $jwks->get($kid);

if ($jwk === null) {
    throw new Exception('No matching key found in JWKS');
}

// Verify the signature
$algorithm = new ES256();
$algorithmManager = new \Jose\Component\Core\AlgorithmManager([$algorithm]);
$jwsVerifier = new JWSVerifier($algorithmManager);

if (!$jwsVerifier->verifyWithKey($jws, $jwk, 0)) {
    throw new Exception('Token signature verification failed');
}

// If we reach here, the token is valid
$payload = json_decode($jws->getPayload(), true);

// Now $payload contains the decoded token data
JWKS Caching
To improve efficiency when doing server-side validation of access tokens, it is highly recommended to cache the JWKS in your backend server.